User Accounts: UI
Exercises
Objective
Now that the User model is in good shape, we need a web interface that supports the following account management functions:
- Allow new users to create an account using a sign-up form
- Create a user profile page that shows a user's account information
- Let the user edit their account information
- Allow users to delete their account
- Show a list of users, for completeness sake
Creating the web interface for user accounts is very similar to creating the interface for movies and reviews, as you did in the previous course. So most of this will be review, and good practice! In terms of MVC components, here's the road map for this exercise:
- Define an
indexaction and corresponding view template that lists all the users - Define a
showaction and corresponding view template that displays the user's profile page - Define a
newaction that renders a sign-up form with fields for the user's name and email - Define a
createaction that creates the user record in the database if their information is valid - Define an
editaction that renders a form for editing a user's account info - Define an
updateaction that updates the user record in the database - Define a
destroyaction that deletes a user's account
Just as a refresher, here's visually what we want:
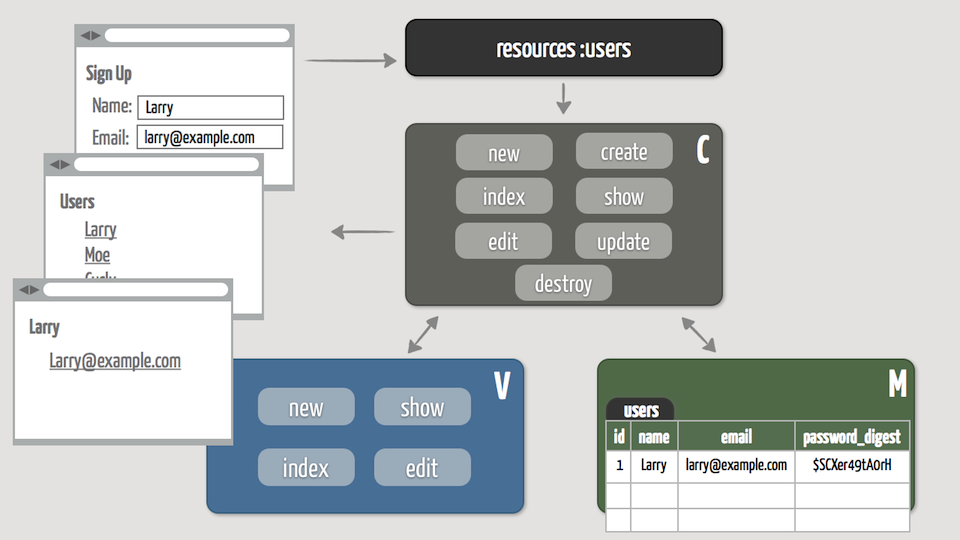
If everything in this exercise flows smoothly for you, then you can know with confidence that you're ready for this follow-up course. If, on the other hand, you find some of these steps confusing or challenging, then we strongly recommend that you complete our Ruby on Rails: Level I course before going any further in this course.
1. List All Users
To get things rolling, let's start by displaying a list of users currently in the database. We'll link each user to their profile page which we'll create shortly.
If you're practicing test-driven development, at this point your next step is to write a feature spec for listing users. Think about what a list of users should display, and then write a spec for that. Or if you prefer to use our spec, click the link below to reveal it. Give it a read through, then paste it into a new list_users_spec.rb file in your spec/features directory.
Go ahead and run the feature spec to set up your goal:
rspec spec/features/list_users_spec.rb
You know you've successfully finished this feature when the spec passes!
-
To get your bearings, print out the defined routes we have at this point:
rails routes
Rails 4: You must use the
rakecommand rather than therailscommand.rake routes
You'll notice we already have the following routes for interacting with users:
     users GET    /users(.:format)           users#index
           POST   /users(.:format)           users#create
  new_user GET    /users/new(.:format)       users#new
 edit_user GET    /users/:id/edit(.:format)  users#edit
      user GET    /users/:id(.:format)       users#show
           PATCH  /users/:id(.:format)       users#update
           PUT    /users/:id(.:format)       users#update
           DELETE /users/:id(.:format)       users#destroy
Remember that these conventional resource routes exist because the resource generator we ran earlier added the following line to the
config/routes.rbfile:resources :users
So we know the URL to use to get a list of users...
-
Browse to http://localhost:3000/users to list the existing users and you'll get an all-too-familiar error:
Unknown action

The action 'index' could not be found for UsersController
-
Following the error, open the empty
UsersControllerthat was also generated by the resource generator and define anindexaction that fetches all the users from the database. -
Then create a corresponding
app/views/users/index.html.erbview template. In the template, generate a list of user names with each name linked to the user'sshowpage. As a nice header, display the number of users at the top. -
Now reload the
indexpage back in your browser and you should see the two users we created previously in the console. -
As a finishing touch, you might consider changing the style of the user listing. In the previous course we learned how to style Rails apps using CSS and Sass. If you're keen to practice your web design skills, by all means go for it! Otherwise, feel free to use our web designer's CSS for the user pages. Just click the link below and copy/paste the CSS into the generated (and currently empty)
app/assets/stylesheets/users.css.scssfile:You'll also need to add the following line to the bottom of the list in the
app/assets/stylesheets/application.cssfile:*= require users
Reload and you should see a slightly different listing style. If it doesn't seem to work, make sure that the
<ul>tag in yourapp/views/users/index.html.erbfile has the CSS idusersin order to trigger our styles. Refer to the solution to cross-check the markup if necessary. -
Finally, the feature spec should pass at this point, so run it to check your work so far:
rspec spec/features/list_users_spec.rb
2. Show a User's Profile Page
When you click on a user's name in the user listing, we want to show their profile page. So that's our next task. For now the profile page will simply display the user's name and email. We'll fill in more profile information incrementally throughout the course.
As usual, below you'll find a feature spec to help drive your workflow or check your work at the end. If you're ready to practice writing your own specs first, this is an easy one to break the ice. Give it a go on your own, and then compare it to the spec below for a sanity check.
-
Browse to the user listing page and try clicking on one of the user names. It should come as no surprise that you get this error:
Unknown action

The action 'show' could not be found for UsersController
-
Following the error, define a
showaction that finds the requested user. -
Then create the corresponding
app/views/users/show.html.erbtemplate that displays the user's name and email. As a bonus, use themail_tohelper to link the user's email so that clicking it pops open your favorite email program with a new message addressed to the user. -
Now navigate from the user listing page to each user's profile page as a quick visual check. If you want to pick up our CSS styles, you'll need to use the same HTML markup as found in the solutions above.
-
Finally, run the feature spec and make sure it passes:
rspec spec/features/show_user_spec.rb
3. Create New User Accounts
Now that we have a user profile page to land on, we're ready to let users create new accounts using a sign-up form. To do that, we'll need to:
-
Add a route to support the custom URL http://localhost:3000/signup.
-
Generate a convenient "Sign Up" link at the top of every page.
-
Define a
newaction in theUsersControllerthat renders thenew.html.erbview template to display a sign-up form. -
Define a
createaction in theUsersControllerthat accepts the form data and uses it to create a new user in the database, but only if the user valid.
Wish you had those requirements expressed in an executable spec? No problem—we've got you covered!
-
According to the existing routes, the URL for displaying the form to create a new user is http://localhost:3000/users/new. That request gets sent to the
newaction in theUsersController. We need to make that work, but we'd also like to support the more descriptive URL http://localhost:3000/signup. We actually want both URLs to show the sign-up form.In the
config/routes.rbfile, add a route that maps aGETrequest for/signupto thenewaction of theUsersController. -
Now run
rails routesand you should see the custom/signuproute and all the conventional resource routes for users:signup GET /signup(.:format) users#new users GET /users(.:format) users#index POST /users(.:format) users#create new_user GET /users/new(.:format) users#new edit_user GET /users/:id/edit(.:format) users#edit user GET /users/:id(.:format) users#show PATCH /users/:id(.:format) users#update PUT /users/:id(.:format) users#update DELETE /users/:id(.:format) users#destroyWe're going to need to generate a "Sign Up" link. Remember how to do that from the previous course? To generate a URL, we call a route helper method. In this case, the name of the route is
signup, so the name of the route helper method issignup_path. -
We want the "Sign Up" link to show up at the top of every page, which means the link needs to get generated as part of the overall application layout.
Look in the layout file (
app/views/layouts/application.html.erb) and you'll notice that in the previous course we arranged things so that all the header markup was in its own partial file namedapp/views/layouts/_header.html.erb. Look in that partial file and you'll see an empty<nav>section. Hey, this looks like a great place for a "Sign Up" link! Use the route helper method to generate the link. -
Now reload and click the "Sign Up" link. The URL in your browser's address field should be http://localhost:3000/signup. Of course, we get an error because we don't yet have a
newaction, but we know how to fix that. -
Define a
newaction that instantiates a newUserobject for the sign-up form to use: -
Next, create the corresponding
app/views/users/new.html.erbview template that generates a sign-up form with the following elements:- a text field to enter the user's name
- an email field to enter the user's e-mail address
- a password field to enter the user's super-secret password
- another password field to confirm the user's password
- a submit button
- also use the existing
app/views/shared/_errors.html.erbpartial we created in the previous course to display any validation errors
It's worth noting that you could use a standard
textfield for entering the email address, but using the HTML 5emailfield gives a better user experience on some mobile devices. For example, iOS devices display a keyboard with the@symbol on the primary screen. -
Reload just to make sure the form shows up as you'd expect before we do some refactoring...
-
We'll want to reuse the form for editing a user, so once you have the form working go ahead and make a form partial.
-
Reload the form to make sure it still works!
-
Next, define a
createaction that uses the submitted form data to create a new user record in the database. If the user is successfully created, redirect to their profile page and show a cheery flash message to let the user know their account was created. Otherwise, if the user is invalid, redisplay the sign-up form. -
Now use the sign-up form to sign up a new user. Try the following combinations for posterity:
- Leave the password and confirmation fields empty
- Fill in a password, but leave the confirmation blank
- Fill in a password and confirmation that do not match
- Fill in a password and matching confirmation
Make sure you end up creating a new user, landing up on their profile page. Home sweet home!
-
The final step should be habit by now: run the spec and make sure it passes.
rspec spec/features/create_user_spec.rb
4. Edit Account Information
Now that new users can sign up, they probably also want to be able to edit their account information. To let them do that, we'll need to:
-
Generate an "Edit Account" link on the user profile page.
-
Define an
editaction in theUsersControllerthat renders theedit.html.erbview template to display an edit form pre-filled with the user's account details. -
Define an
updateaction in theUsersControllerthat uses the submitted form data to update the user in the database, but only if the form data is valid.
We trust you know what to do from now on when you see these tantalizing spec links. :-)
-
First we need to put an "Edit Account" link on the user profile page. Use a route helper method to generate that link in the footer area of the
showpage (which we're calling the user profile page). -
Then define the
editaction which finds the user matching theidparameter in the URL so we can populate the edit form with the user's existing information. -
Now that we have the user we want to edit, create the corresponding
app/views/users/edit.html.erbview template. It needs to display the same form we used to create a new user, which we already have in a partial. (Don't you love it when a plan comes together?) So use that partial to generate the edit form. -
Back in your browser, revel in your work by clicking the "Edit Account" link for a user. You should see a form pre-filled with the user's name and email, but the password fields are blank... as they should be!
-
Next, define the
updateaction to use the submitted form data to update the user in the database. If the user is successfully updated, redirect to their profile page with a flash message confirming that their account was successfully updated. Otherwise, if the form data is invalid, redisplay the edit form so the user can give it another try. -
Then, back in your browser, change the user's name and/or email, but leave the password fields blank. You should get redirected to the user's profile page and see the updated information.
-
Now edit the user account again, and try typing something in the password field. Submit the form and you should get password validation errors. If you type anything into the password fields, then both fields are required and must match. In other words, when updating a user the password-related validations only run if you try to change the password. That's another nice touch that comes courtesy of using
has_secure_password. -
Now for a bit of customization. You may have noticed on "Edit Account" form that the default submit button says "Update User". If you then look at the "Sign Up" form, the submit button says "Create User". Rails is smart enough to name the button based on whether the
@userobject referenced in theform_for(@user)line represents an existing user already stored in the database (we're editing it) or a new user not yet stored in the database (we're creating it).The default button name is convenient, but suppose we want to use account vernacular and have the button say "Create Account" or "Update Account". To do that, simply locate the following line in the form partial:
<%= f.submit %>
Then replace that line with the following lines:
<% if @user.new_record? %>
  <%= f.submit "Create Account" %>
<% else %>
  <%= f.submit "Update Account" %>
<% end %>
All we do here is call the
new_record?method that's available on all ActiveRecord objects. It returnstrueif the object hasn't already been saved to the database andfalseotherwise. Then depending on the answer, we pass a string label to thesubmitmethod. It's a small thing, but users tend to think in terms of their account and using words that align with their thinking is reassuring.Note: This change will cause your
create_user_spec.rbspec to fail because it's looking for a "Create User" button. So you'll need to change it to click the "Create Account" button instead. -
Remember to check your work by running the spec!
rspec spec/features/edit_user_spec.rb
5. Delete Accounts
We hope it doesn't happen often, but users may want to delete their account. To support that, we need to:
-
Generate a "Delete Account" link on the user profile page.
-
Define a
destroyaction in theUsersControllerthat deletes the user from the database and redirects to the user listing page with a confirmation flash message.
-
Generate a "Delete Account" link in the footer area of the user profile page.
-
Implement the
destroyaction. Once the user's record has been destroyed, redirect to the application home page and flash an alert message confirming that the account was successfully deleted. -
Now go back to the browser and click the "Delete Account" link. You should end up on the application home page. Go to the user listing page and the user you deleted should not be displayed in the listing.
-
This would be an ideal time to run the feature spec!
-
Finally, you might want to use your new account management web interface to re-create the user you just deleted. :-)
6. Run All the Specs
Before checking all these new features off the list, it's reassuring to know that we didn't inadvertently break any existing features. One of the benefits of incrementally building a suite of automated tests is that at any time we can run them all in one fell swoop to get rapid feedback. Remember how to run all the specs?
Solution
The full solution for this exercise is in the
user-accounts-ui directory of the
code bundle.
Bonus Round
Want to challenge yourself? These optional bonus exercises take things up a notch and draw on skills you learned in this course and the previous course.
Show "Member Since" Date
As a nice touch, on the user's profile page show the month and year that the user became a member (created an account) on our site. Format the "member since" date as "January 2015", for example.
Add a Username Field
In addition to a full name and email, some sites also allow users to set a unique username. It's your online nickname or screenname. For example, Mike's Twitter username is "clarkware".
Add a username field to the users database table, and allow users to specify a username when creating (and editing) their account. Usernames must be present and only consist of letters and numbers (alphanumeric characters) without spaces. Also, no two users can have the same username in the database. Treat usernames as being case-insensitive.
Try it on your own first (after all, we're in the bonus round!) and then follow the steps below if you need a hand.
-
Generate a migration to add a
usernamecolumn to theuserstable. -
Declare appropriate validations in the
Usermodel. -
Update the form partial to include a text field for entering the username.
-
Don't forget to add the
usernamefield to the list of permitted parameters so that the username can be assigned from form data. -
Finally, make sure to update the model and feature specs accordingly so they continue to pass!
Add a Profile Image
If you want to give the user profile page a bit more personality, you might consider adding a profile image for each user. A popular way to do that is by integrating with the free Gravatar service. Gravatar lets you upload your preferred profile image (called a global avatar image) to the Gravatar site and associate that image with a particular email address. Then when you create a user account on another site using that same email address, the site can use the Gravatar service to show your preferred profile image. It's really convenient because you can register your profile image with Gravatar once and the image automatically follows you to any Gravatar-enabled site.
It's relatively easy to Gravatar-enable an app, and we'll get you started...
-
First, to access a user's profile image, we need to generate an MD5 hash of the user's email address. To do that, add the following method to your
Usermodel:def gravatar_id Digest::MD5::hexdigest(email.downcase) end
That method simply returns a string that represents the hashed value for the email address. For example, for Mike's email address we'd get back the string
58add23fa01eae6d736adce86e07ae00. For every unique email address, the method will return a consistent and unique hashed value. Think of it as your unique Gravatar id, which is why we named the method as such. -
Then to request the associated profile image that's stored on Gravatar's site, we use a URL with the form http://secure.gravatar.com/avatar/gravatar-id where the
gravatar-idpart is replaced with a particular user's gravatar id. For example, Mike's profile image is at http://secure.gravatar.com/avatar/58add23fa01eae6d736adce86e07ae00. Open that URL in a new browser window and you get Mike's mugshot. Now, to actually show Mike's profile image on his profile page, we need to generate an image tag for the image that lives on Gravatar's site.To do that, write a custom view helper called
profile_image_forthat takes a user object as a parameter. It needs to generate a string that represents the URL for that user's Gravatar image and then use that URL to generate and return an image tag for the image. Put the helper method in theusers_helper.rbfile. -
Next, update the user profile page to call the
profile_image_forhelper so that the user's profile image is shown on the page. -
Reload a user profile page and you should either see the default Gravatar image (a blue square) or an actual profile image if the user's email has already been associated with a Gravatar image. Now might be a good time to create your own Gravatar image!
Check the Log File
We've been diligent about not storing plain-text passwords in our database, but we also need to be careful not to expose them in other areas of our application.
For example, every time a form is submitted, we've seen that Rails automatically records the submitted form data in the log file. In development mode, everything is logged in the log/development.log file which is also displayed in the command window where your app is running.
Check out the log file and scroll back to the part where you signed up a new user. You should see something like this:
Parameters: {"utf8"=>"✓", "authenticity_token"=>"Ur/HVsiN+hwb3An6lvx+CpXxPmyp4JAujKzzHEaUfPg=", "user"=>{"name"=>"Larry", "email"=>"larry@example.com", "password"=>"[FILTERED]", "password_confirmation"=>"[FILTERED]"}, "commit"=>"Create Account"}
In particular, notice that the submitted password and password_confirmation form parameters were masked as [FILTERED] so that the actual values aren't displayed in the log file. This is another example of the Rails defaults trying to help us do the right thing. It works because of the following line in the config/initializers/filter_parameter_logging.rb file:
Rails.application.config.filter_parameters += [:password]
That line simply appends the key :password to the filter_parameters array. Then, before the params hash gets logged, the values for all the keys matching the regular expression /password/ get replaced with the string [FILTERED]. It's as if someone used a big black marker to hide all the classified information!
Passwords are the most common parameter that need to be filtered from the log files, so Rails takes care of that for you. But you'll want to consider filtering other sensitive parameters specific to your application.
Force SSL in Production
When a user types in her password and submits the sign-up form, the form data (including her plain-text password) travels over the network before reaching our server. That's not a problem when we're running in development mode: the server is running on our machine and we're the only user. But if you plan to deploy this application to a production server, then you'll need to ensure that sensitive data entered on your site via a user's browser is always transferred back to your server through an encrypted connection.
To do that, open the config/environments/production.rb file and uncomment the following line:
config.force_ssl = true
This setting, which only effects your app when it's running in production mode, forces all access to the app over SSL. If a browser tries to make a non-SSL request to the app, Rails will automatically redirect the browser to the same URL using the HTTPS protocol.
For this to work, you'll need to have SSL configured properly on your production server. That task is way beyond the scope of this course, and likely something you'll want to take up with your favorite system administrator. If you're using Heroku as we did in the previous course and you don't require a custom domain name, then they've already done the grunt work for you. Just deploy your app with the change above and you're good to go. Otherwise, to configure Heroku to run SSL on a custom domain, check out the Heroku documentation on SSL.
Wrap Up
Nicely done! Folks are now able to create user accounts complete with super-secret passwords. Working incrementally through the process of designing a web interface for managing user accounts allowed us to review the following Rails fundamentals:
- Creating a new resource using the generator
- Applying a migration file
- Declaring validations in the model
- Using the Rails console to create records in our database
- Defining actions to support the conventional resource routes:
index,show,new,create,edit,update, anddestroy - Linking pages together
- Using partials to reduce view-level duplication
- Adding custom URLs and using route helper methods
- Providing feedback with flash messages
- Writing and running specs
Again, this should be familiar ground. All resources in Rails essentially follow the same routes and conventions we used in this exercise. If this exercise felt like a review for you, then you're ready to take on this course. If instead you found yourself struggling with the syntax or concepts in this exercise, then before going any further we recommend completing the Rails Level I course.
With all this now in place, in the next section we'll allow users to actually sign in to their account. Open sesame...